Selecting the correct teat size
Knowing when to move to the next teat level is an important – and sometimes confusing – part of a comfortable and happy feeding experience for you and your baby.
While most bottles offer various teat levels that are tied to an age range (for example, 3 months+), every infant has their own feeding style, which is not necessarily a reflection of their age or size.
How Will I Know When to Switch?
There is no “right” time to change your baby’s teat level. Some babies are content using Level 1 throughout their feeding days, while more aggressive eaters may advance sooner than expected. Your baby will offer signs if the flow is not fast enough and it’s time to move up a level. Typical signs include baby:
- Taking longer to finish eating
- Becoming fussy or irritated while eating
- Falling asleep during feeding
With newborns, especially premature babies, the teat flow rate can actually be faster than your infant can tolerate. If your baby is exhibiting any of these signs while eating, you may want to try a slower flow (lower level) teat:
- Gulping
- Hard swallowing
- Coughing
- Choking
- Milk dripping from the mouth
- Refusing the bottle
To address all feeding stages and styles, Dr. Brown’s offers a series of bottle teats with increasing flow rates and you can always check with your Healthcare Professional as to the most appropriate level to use for your baby.
Preemie Teat, 0 months+
- Designed for premature babies and babies who have a slower feeding preference
- Slow flow is great for breastfed babies when switching between bottle and breast; mimics the slower flow of breastfeeding
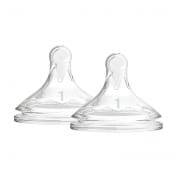
Level 1 Teat, 0 months+
- A Level 1 or newborn teat generally comes on every bottle and is a great starting point for many babies.
- Ideal choice for your infant if she is feeding well and shows no signs of feeding challenges.
Level 2 Teat, 3 months+
- As a baby’s feeding develops and they are taking a longer time feeding from a Level 1 teat, many parents choose to move up to a Level 2 teat.
- Consider Level 2 if your baby is accepting early solid foods, or if their Healthcare Professional has recommended thickening their milk.
Level 3 Teat, 6 months+
- As a baby’s feeding develops and they are taking a longer time feeding from a Level 2 teat, many parents choose to move up to a Level 3 teat.
- Consider Level 3 if your baby is sitting up, if they are eating solid foods, or if their Healthcare Professional has recommended thickening their milk.
Level 4 Teat, 9 months+
- As a baby’s feeding develops and they are taking a longer time feeding from a Level 3 teat, many parents choose to move up to a Level 4 teat.
- Appropriate if your child has shown consistent feeding with no difficulties and is taking larger amounts at the breast and bottle.
- Consider Level 4 for your baby if they are eating finger foods, drinking from a sippy cup, or if their Healthcare Professional has recommended thickening their milk.
Y-Cut Teat (9 months+)
Consider the Y-Cut nipple if your Healthcare Professional has recommended thickening your baby’s milk.
Master the Art of Formula Making
Making a bottle of formula for your baby is straight forward – just mix the water and formula together based on package instructions, and voila! Yet just like with any recipe, there is an art to it that – with a few quick tips – can turn you into a Top Formula Chef.
First, let’s go back to the basics:
- Wash Well: Use hot, soapy water to clean all bottle parts – and your hands.
- Follow the Manufacturer Instructions: Formula manufacturers have different mixing guidelines, so check the instructions if and when you change formulas.
- Measure Precisely: Too much powder might cause an upset tummy for baby.
- Check for Clumps: Eyeball the formula after mixing to look for clumps. It’s unlikely be occasionally lumps can get stuck in the bottle teat, causing frustration for both you and your little one.
- Mark the Time: Always dispose of unused milk – never re-heat your baby bottle!
Stir, Shake, Swirl or Mix?
Here is where the real artistry to formula-making comes in: Blending. You can blend your formula several different ways, each with different results.
Swirling Formula
Swirling the bottle works well. Swirling formula still helps prevent air bubbles and pressure build up, with one catch: Double check for clumps before you call it a masterpiece. You can also use a clean spoon to stir.
Shaking Formula
While Dr. Brown’s bottles are designed to help remove air, shaking the bottle can do more than just add in extra air bubbles and pressure; it can actually shake up a leak from the bottle collar. You can avoid the leak by removing the internal parts – the vent insert and reservoir – and using a Travel Cap before shaking your formula together.
Bonus Tips:
- If using bottled water you should look for water that contains less than 200 milligrams (mg) a litre of sodium (also written as Na) and no more than 250mg a litre of sulphate (also written as SO4).
- If you are mixing on the go or you just want to save time later, consider a formula dispenser
Now that you know the art behind formula mixing, you’ll be ready to follow any formula recipe – and help ensure Happy Feeding™ each and every time.
How to use Dr Brown’s Training Cups
Making the transition from the breast or bottle to a training cup is another one of those signs that your baby is not such a baby anymore. While you’re wondering how your little one grew so fast, you may also be wondering how to make this important transition happen as smoothly as possible. Some babies make the transition quite easily, and some will make you crazy wondering if they’ll ever get there!
Which Cup is Right for You?
You’ve surely noticed by now that many baby products are staged by the baby’s age. While there is no specific “order” for you to follow with cups, you’ll find that most are designed to reflect a baby’s approximate age or development stage. That said, some children prefer a straw cup to a sippy cup, and there should be no issue if your child is ready. You may want to do a little experimentation.
The details on all Dr. Brown’s training cups can be found on our website, but here is a quick reference guide:
- 2-in-1 Transition Bottle Kit – This kit easily converts from Options® bottle to a sippy spout. It simply replaces the vent and bottle teat with the super soft sippy spout.
- Baby’s First Straw Cup (6+ months) – Helps your child transition from bottle to cup and allows for spill-proof drinking at any angles
- Soft Spout Transition Cup (6+ months) – Contoured handles and a one-piece, spill-proof spout make this a great first cup for your baby.
- Soft Spout Toddler Cup (9+ months) – A contoured design to help your toddler hold the cup like a grownup.
- Hard-Spout Insulated Cup (12+ months) – Helps your child develop their sipping skills, including a spill-proof hard spout that prevents messy cleanups.
Proper Cup Assembly and Cleaning
As is the case with so many baby products, proper cleaning and drying is key – especially with training cups. Here are a few simple tips to help you keep your cups sparkling clean:
- Don’t let your cups sit for too long after use – wash them as soon as possible.
- Completely disassemble all parts before cleaning.
- Allow the parts to dry completely and wait to re-assemble the cup until the parts are dry.
Your cup parts can be washed in hot, soapy water. The Dr. Brown’s bottle brush works well for this. You can also put all the parts in the dishwasher, just be sure to use the top rack only. It’s best to avoid boiling or microwave steam sterilising your cup parts to ensure everything seals correctly. Once you’ve got it down, cleaning and assembly will be quick and easy!
What if my baby won’t take a sippy cup?
In your never-ending quest to minimise stress, here are a few other tips that should help make your cup transition easier.
- Eliminate distractions: Avoid beginning the transition when you have other big life events happening, such as a move. The more comfortable and familiar everything is to your baby, the better your chances.
- Try a soft spout: A soft spout cup will feel more familiar than hard plastic. While some babies jump right to hard plastic, some need a soft spout first. Lend a Helping
- Hand: Touching the spout to the roof of your baby’s mouth will stimulate the suck reflex, which shows him the spout is like a nipple.
- Substitute if needed: Try putting just a bottle nipple in baby’s mouth to initiate sucking, and then switch to the sippy cup spout.
- Get the timing right: Early on, avoid switching from bottle to cup during early morning and later-day feedings when babies tend to be fussier. Use mid-day feedings and then gradually switch over to all meal times.
- Switch up the liquid: If you’re getting any resistance, experiment with milk or water. As your baby gets more used to the cup, she’ll get more content with whatever you put in it.
- Don’t give up too fast: If baby doesn’t take to a cup right away give it a few weeks and try again. Most babies make the transition successfully.
Give Teething Baby a Gum Massage
The way your baby is currently working your finger is a clear indication they’re going through teething, which begins on average around 6 months old, but can begin anytime between 3 and 12 months. And it’s actually a great way to numb their gums. Just gently rub a clean finger along their gums and not only will you relieve some pain, your direct interaction helps calm baby. But baby teeth can be sharp and once a tooth or two comes through, you may want to consider switching to something not made of your flesh.
Swap Your Finger for a Textured Teether
A textured teether is a teether that features some sort of raised pattern. The reason texture is so important is because it applies small spots of focused pressure much like your finger. Look for a textured teether that can reach all the way to the back of baby’s mouth without choking or gagging. The raised textures are designed specifically to target sensitive areas.
Chill Teething Baby’s Teether
A chilled teether is perfect particularly for incoming front teeth, as it doesn’t reach very far into the back of baby’s mouth. They’re already familiar with it, so getting them to accept it won’t be an issue. All you need to do is dip the teether into cold water and place in the freezer to chill. Be sure to supervise baby.
Freeze Their Favourite Fruits
Choose fruit that’s age-appropriate and prepared according to their current chewing capabilities. A rough idea includes:
- Pureed apples, bananas and peaches for 4 – 6 months
- Strained peaches, avocado, bananas at 6 – 8 months
- Mashed fruits at 8 – 10 months
- Cubes or strips of fruit at 10 – 12 months
Frozen fruit prepared appropriately can be placed inside a mesh or silicone feeder to mitigate the mess and help baby feed more comfortably.
Distract Them from the Pain
If they aren’t dealing with a high-grade fever or other warning signs that something is going on other than teething, your silly faces, funny noises, and general interaction with them can do the trick. Taking their focus away from the pain and putting it on you also has the added benefit of bonding, telling baby that you are a serious source of entertainment.
All mums and dads who have been through the teething period will remind you of one saving grace: This will not last forever. Fill your toolbox with ways to ease their pain, and day by day you will get through it.

